Dedicated to improving maintenance activity using best visual factory practices. If you can't understand what is happening at a process or how to correctly set-up a machine then it ain't visual enough. Real world examples of Visual Maintenance.
Monday, 16 January 2012
Safety lock
In this example before the labeling there was just a handle with no explanation of what it was for and no one knew there was another one at the other side of the machine. A simple description solves this and helps ensure that backed up with training that the safety locks will be used in the right circumstances.
Friday, 13 January 2012
Descriptive isolation
it is still felt though that an addition of a pictorial reprentation would be of further benefit.
Labels:
5S,
descriptive,
electrical best practice,
isolator,
label,
visual management
Waste bin floor markers
All plastic waste bins have a coresponding colour coded cirle on the floor ensuring the bin is always left in the correct predetermined best position.
Cleaning station
All cleaning jobs are broken up into small 5 - 10 minute chunks that can be slotted in around natural stoppages throughout the week and followed on a TPM T Card board.
Labels:
5S,
cleaning station,
quick cleaning,
shadow board,
TPM
Thursday, 12 January 2012
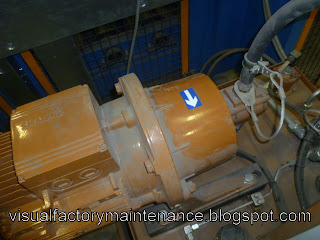
Hydraulic pump / motor direction
I have found the best place to mount the arrow is on the bell housing as it most likely stays for the life of the machine. Motors and pumps can get changed out so any arrows placed on them disappear with the changed out component.
Labels:
direction,
electrical,
hydraulic,
motor,
pump,
visual management
Colour coded lubrication points
Here all the lubrication points on the machine are marked up colour coded and numbered so TPM lubrication routines can be carried out easily by operators or maintenance. Each machine has a corresponding A3 lubrication map at its information point for all lube point on the machine.
The lubrication map follows the 5R lubrication principle. RIGHT point / RIGHT lube / RIGHT quantity / RIGHT frequency / RIGHT method.
Labels:
5S,
cleanliness,
grease nipple,
lubrication point,
TPM,
visual management
CIL (Cleaning, Inspection and Lubrication) point labelling
This is an example of how to best show where certain Cleaning / Inspection / Lubrication points are during a maintenance or TPM routine.
The numbered points correspond to checks detailed on Standard Work instruction and helps personnel find the correct points easier and faster ensuring the right work gets carried out.
Labels:
5S,
cleanliness,
lubrication point,
maintenance task,
operator task,
TPM,
visual management
Subscribe to:
Posts (Atom)


